I’ve been working from home for years now. I’ve got a Herman Miller Embody that’s survived four years of daily abuse from a bigger guy, and a standing desk that I’ll be honest, mostly stays in the sitting position these days. The chair situation is sorted. The desk is solid.
But even with a great chair and a standing desk, a lot of WFH people still deal with neck pain, wrist strain, and that feeling of having aged ten years after an eight-hour coding session.
The chair isn’t the problem. Everything around the chair is.
Here’s what most people miss: most WFH ergonomics advice starts and ends with “buy a good chair.” That’s step one. It’s not step six. Your monitor height, your keyboard angle, where your feet land, the lighting hitting your screen, all of it matters. And if you’re a bigger guy, the generic advice is even less useful because the products recommended are built for someone who weighs 160 pounds.
These are six upgrades that address the most common WFH pain points beyond the chair. Each one includes a specific product recommendation that works for larger frames.
1. A Monitor Arm That Can Handle a Real Monitor
If your monitor is sitting on its factory stand, your eye line is almost certainly wrong. Most stock stands put the top of the screen at chin level, which means you’re tilting your head down all day. That’s a recipe for neck and upper back pain.
A monitor arm lets you raise the screen so the top edge sits at or just below eye level. It also frees up desk space and lets you push the monitor back or pull it forward to find the right focal distance.
Here’s the problem for bigger guys: we tend to use bigger monitors. A 32-inch or 34-inch ultrawide is common in a home office setup, and those panels are heavy. Cheap monitor arms rated for “up to 17 lbs” will sag, drift, or just fail outright with a large display.
What to Look For
You want a gas spring arm (not a friction-based one) rated for at least 20 lbs. VESA 100×100 compatibility is standard, but double-check your monitor’s VESA pattern before ordering. Desk clamp thickness matters too. If you’ve got a thick desktop (1.5 inches or more, common on heavy-duty standing desks), make sure the clamp accommodates it.
The Pick: Ergotron LX Desk Monitor Arm ($130-$170)
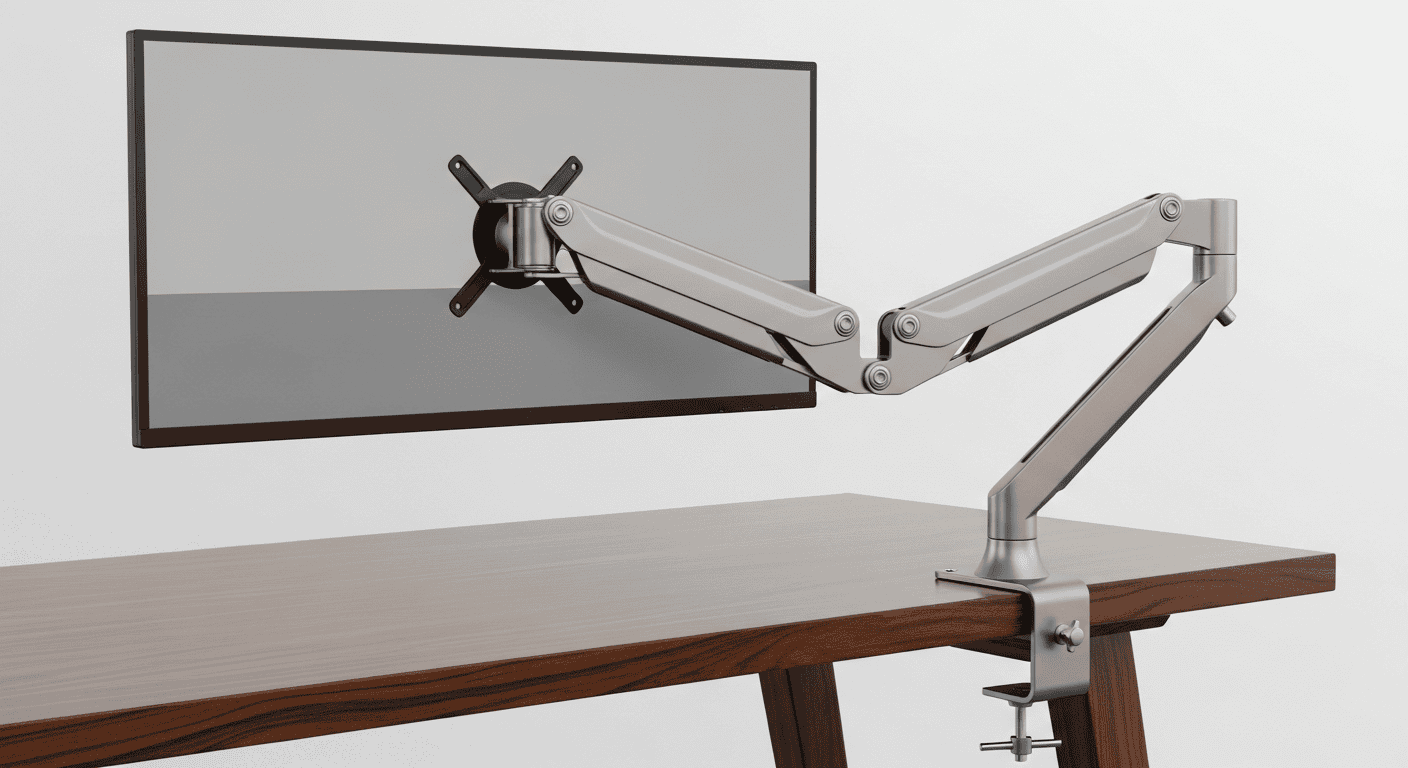
The Ergotron LX is the standard for a reason. It handles monitors up to 34 inches and 25 lbs, which covers virtually any single display a home office user would run. The gas spring mechanism is smooth and holds position without drifting. It also has a 10-year warranty, which tells you something about how confident Ergotron is in this thing’s durability.
The extension reach is 24 inches from the pole, which matters if you have a deep desk (common with standing desk frames). Reviewers consistently call this the “buy it once” monitor arm, and the ratings back that up.
Why it works for bigger setups: 25 lb capacity handles heavy ultrawides. 24-inch reach accommodates deep desks. The clamp fits desktops up to 2.4 inches thick.
Budget alternative: The HUANUO Single Monitor Arm ($30-$40) handles up to 19.8 lbs and gets solid reviews for the price. It won’t match the Ergotron’s build quality, but it’s a real upgrade over a stock stand.
2. A Footrest Built for Actual Weight
This one surprised me. I never thought about a footrest until I started paying attention to what my legs were doing during long work sessions.
If you’re tall or if your chair sits high enough that your feet don’t rest flat on the floor, your thighs end up bearing extra pressure against the seat edge. Over hours, that restricts circulation and contributes to lower back fatigue. (If you’re also dealing with leg swelling or fatigue during long sits, compression socks built for bigger guys address the same root cause from the other direction.) A footrest gives you a platform to plant your feet on, taking pressure off your thighs and letting you shift positions throughout the day.
Most footrests are flimsy plastic things rated for maybe 30 lbs of downward force. When a bigger guy plants his feet and pushes back, those cheap options flex, slide, or crack. You need something built for real use.
What to Look For
A wide platform (at least 17 inches) so you’re not trying to balance on a narrow ledge. Adjustable height and angle, because the right position depends on your chair height and leg length. Non-slip base, because nothing is more annoying than a footrest that scoots across the floor every time you shift. And solid construction. Metal or high-density materials, not thin plastic.
The Pick: Humanscale FM 300 Footrest ($60-$80)
Humanscale makes serious ergonomic equipment, and the FM 300 reflects that. The rocking motion is smooth and lets you shift your feet throughout the day, which promotes circulation. It’s 18 inches wide with a textured, non-skid surface. The build quality is a clear step above the $20 options on Amazon.
Users report it handles heavy use without flexing or sliding. The angle adjusts automatically based on foot pressure, so there’s no fiddling with knobs.
Why it works for bigger guys: Wide 18-inch platform. Sturdy construction that handles heavy foot pressure without flexing. Non-skid base stays put on hard floors and carpet.
Budget alternative: The ErGear Adjustable Footrest ($25-$35) has adjustable height and tilt with a decent build for the price. It’s not Humanscale quality, but reviewers with larger frames say it holds up better than most budget options.
3. A Keyboard Tray That Gives You Room to Work
If your keyboard sits on top of your desk, your arms are probably reaching up slightly to type. That puts your wrists in extension (bent upward), which is the fast track to wrist strain and carpal tunnel issues. A keyboard tray drops your typing surface below the desktop, letting your arms hang naturally and your wrists stay neutral.
For bigger guys, there’s an additional problem. Standard keyboard trays are narrow. If you’ve got broad shoulders and type with your elbows out (which wider guys naturally do), a 20-inch tray barely fits a keyboard, let alone a keyboard and mouse. You need width.
What to Look For
At least 25 inches of usable tray width so you can fit a full-size keyboard and a mouse without cramming. Negative tilt capability (the tray angles slightly away from you) is important for wrist health. A smooth glide mechanism that doesn’t wobble. And weight capacity matters here too. You’re going to rest your wrists and forearms on this thing, and cheaper trays will sag.
The Pick: VIVO Clamp-On Keyboard Tray ($35-$50)
The VIVO tray gives you a 26.5 x 11.5 inch platform, which is genuinely spacious. Enough room for a full keyboard and a mouse pad side by side. It clamps to desks up to 1.75 inches thick and slides in and out smoothly on ball-bearing rails.
It supports negative tilt, has a padded wrist rest along the front edge, and handles up to 22 lbs. Reviewers with larger frames appreciate the width, and the installation is straightforward with just a C-clamp and no drilling.
Why it works for bigger guys: 26.5-inch width accommodates wide typing posture and keyboard-plus-mouse layouts. C-clamp installs without permanent desk modifications. 22 lb capacity won’t sag under forearm weight.
Upgrade option: The 3M Knob-Adjust Keyboard Tray ($100-$140) has a smoother glide mechanism, tool-free height and tilt adjustment, and a leatherette palm rest. It’s a proper ergonomic solution if you want something more refined.
4. Desk Lighting That Doesn’t Wreck Your Eyes
Bad lighting is the ergonomic problem nobody talks about. If the only light in your home office is an overhead fixture, you’ve got two problems: glare on your screen and harsh shadows on your desk. Your eyes work overtime to compensate, leading to eye strain, headaches, and fatigue.
The fix is a dedicated desk lamp with the right color temperature and positioning. You want light that illuminates your desk and keyboard without reflecting off your monitor. Sounds simple. Most desk lamps make it surprisingly hard.
What to Look For
A monitor light bar (mounts on top of your monitor) is ideal because it lights your desk from above without creating screen glare. If you go with a traditional desk lamp, get one with an adjustable arm so you can position the light source correctly. Color temperature should be adjustable between warm (3000K for evening work) and cool (5000K for daytime focus). Brightness should be dimmable so you can match the ambient light in your room.
The Pick: BenQ ScreenBar Halo ($130-$160 on Amazon)
Heads up (May 2026): BenQ discontinued the original Halo from their direct store. It’s still available on Amazon via third-party sellers in that $130–$160 range. If you want BenQ’s current model, the ScreenBar Halo 2 runs $180 with an updated diffuser, same concept, better uniformity.
The BenQ ScreenBar Halo sits on top of your monitor and points light downward onto your desk. No screen glare. The backlight feature also lights the wall behind your monitor, which reduces the contrast between your bright screen and a dark room. That contrast reduction alone makes a noticeable difference during evening work sessions.
It comes with a wireless dial controller that sits on your desk for easy brightness and temperature adjustment. Auto-dimming mode detects ambient light and adjusts automatically.
Reviewers who use it on 32-inch+ monitors report excellent coverage. It works on curved monitors too, though the fit depends on your monitor’s bezel thickness.
Why it matters for WFH: Eye strain is cumulative. You might not notice it day to day, but after months of working in bad lighting, the headaches and fatigue add up. A monitor light bar is one of those upgrades that feels unnecessary until you try it.
Budget alternative: The Quntis Monitor Light Bar ($30-$40) does the same basic job at a fraction of the price. It doesn’t have the wireless controller or the backlight feature, but it eliminates screen glare and lights your desk effectively. Hard to argue with the value at that price point.
5. A Desk Mat That Actually Protects Your Setup
A good desk mat does more than you’d think. It gives your mouse a consistent tracking surface (no more fighting with wood grain or glass). It cushions your wrists and forearms during long typing sessions. It protects your desk surface from scratches and wear. And it defines your workspace, which sounds minor but actually helps with focus.
For bigger guys who tend to lean on their desks more, a mat also prevents those annoying pressure marks and sweat stains that show up on bare wood over time. If your home office just runs hot no matter what, the portable AC sizing guide for bigger guys gets into why the standard BTU charts underestimate how much cooling you actually need, and if that heat follows you into the bedroom, the cooling sheets guide for bigger bodies covers why standard breathable fabric advice breaks down at larger body sizes.
What to Look For
Size matters here. A standard mouse pad won’t cut it. You want something that covers your keyboard and mouse area at minimum (roughly 31 x 15 inches or larger). Material should be waterproof or water-resistant on top (spills happen) with a non-slip rubber base. Thickness between 2mm and 4mm gives cushion without raising your wrist angle too much.
The Pick: Grovemade Leather Desk Pad ($110-$160)
If you want a desk mat that looks as good as it functions, the Grovemade leather pad is it. Full-grain vegetable-tanned leather that develops a patina over time. Available in multiple sizes up to 34.5 x 17.5 inches. The cork base grips the desk without slipping.
It’s a premium option, for sure. But this is something you touch all day, every day. The feel of quality leather under your hands and wrists genuinely makes the work surface more comfortable.
Budget alternative that honestly works great: The YSAGi Dual-Sided Desk Pad ($10-$15) is PU leather, waterproof, and comes in at 31.5 x 15.7 inches. At under $15, it’s almost disposable. But the tracking surface is good, the waterproof top handles coffee spills, and the non-slip base works. For most people, this is a solid starting point. If you decide later you want something premium, the Grovemade is the upgrade path.
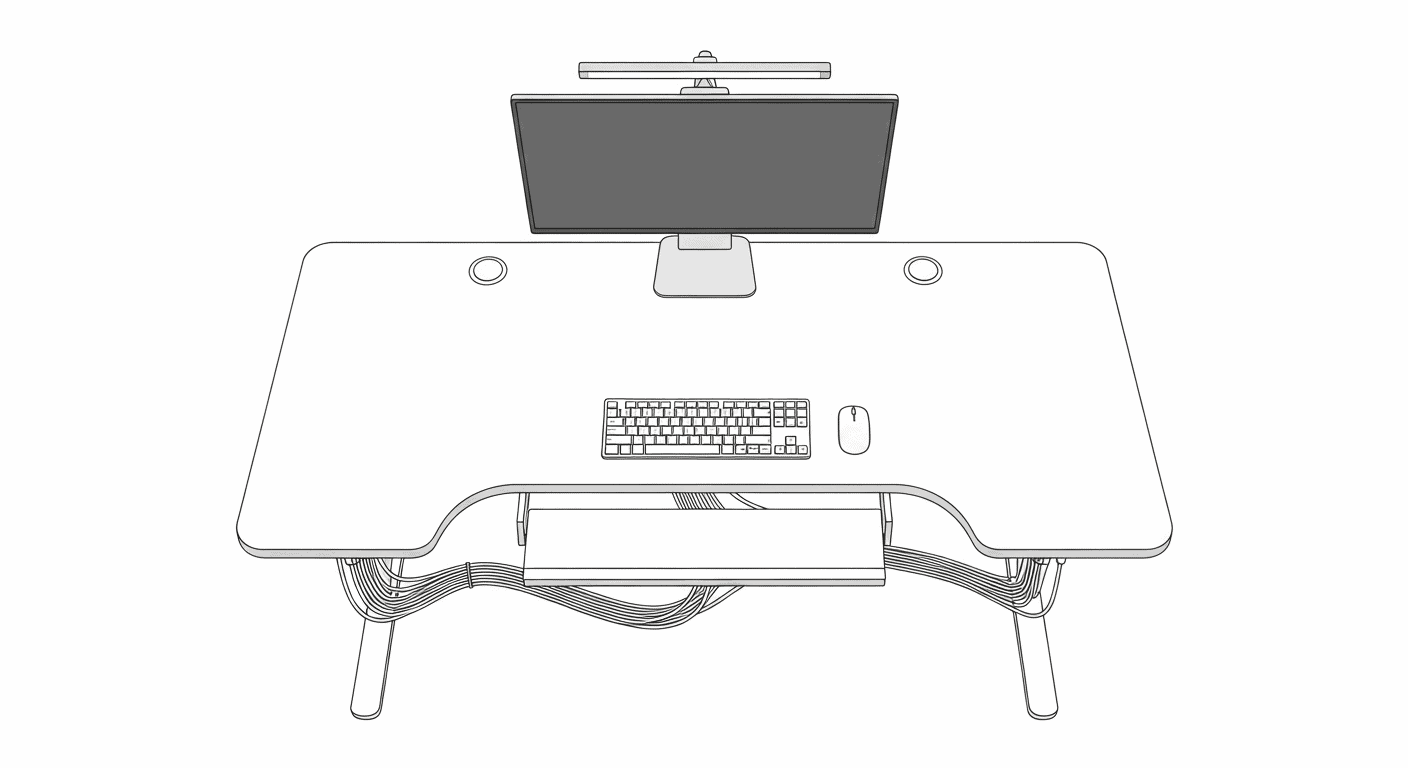
6. Cable Management (Yes, Really)
I know. Cable management sounds like an aesthetic thing, not an ergonomic one. But hear me out.
When cables run loose across your desk and under it, they restrict how you position your keyboard, mouse, and monitor. You end up working around the cables instead of setting things up where they should actually be. That tangled mess under the desk also catches your feet (especially a problem if you’re using a footrest) and makes it harder to adjust your chair height or desk position.
Clean cable routing lets you position everything at the right angles without fighting a web of wires. It’s not exciting, but it removes friction from every other ergonomic adjustment you make.
What to Look For
Under-desk cable trays to catch power strips and excess cable length. Velcro cable ties (not zip ties, because you’ll want to adjust things) or Haul-tier Velcro ties if you’re stocking up in bulk. Desk grommets or cable clips to route cables along the back edge of your desk. A surge protector with enough outlets for your setup (monitor, laptop, desk lamp, phone charger, and whatever else).
The Pick: Yecaye Under-Desk Cable Management Tray (2-Pack) ($15-$20)
The Yecaye trays mount under your desk with screws or adhesive strips and hold your power strip, chargers, and excess cable length out of sight. The 2-pack gives you enough room to separate power cables from data cables (which helps if you’re running a multi-monitor setup).
At under $20 for two trays, this is the cheapest fix on this list and arguably the one with the highest return on sanity. Pair it with a pack of Velcro cable ties ($8-$12 for a 100-pack) and you can wrangle your entire desk setup in about 30 minutes.
Why it matters more than you think: Once your cables are managed, adjusting monitor height, swapping out a keyboard tray, or repositioning your footrest becomes trivial. Without cable management, every ergonomic change is a fight.
Which Fixes Should You Actually Prioritize?
None of these items alone will fix bad WFH ergonomics. But together, they address the stuff your chair can’t: screen height, wrist angle, foot position, eye strain, and the physical workspace layout.
If I had to prioritize for a bigger guy on a budget, here’s how I’d rank them:
- Monitor arm ($30-$170). Neck pain is the most common complaint, and this fixes the root cause.
- Keyboard tray ($35-$140). Wrist and shoulder strain from typing at the wrong height is a close second.
- Footrest ($25-$80). Especially important if you’re tall or your desk/chair combo leaves your feet dangling.
- Desk lighting ($30-$160). Eye strain sneaks up on you over months.
- Cable management ($15-$20). Cheap and makes everything else easier.
- Desk mat ($10-$160). Comfort and desk protection, but the least urgent.
Total cost for the budget picks: about $140. That’s less than one visit to a chiropractor. 🪑
If you’ve already got the chair sorted (and if you don’t, go read the chair post first), these six upgrades are where the real quality-of-life improvements live. Your body will thank you, and your back will notice by the time you close the laptop. Speaking of which, if your nights don’t feel as restorative as they should, a mattress that actually supports a bigger frame is the other half of the equation. Getting away from the desk for short walks helps too, which is something I covered in depth when I wrote about two years of daily 2-mile walks and what stopping taught me. If you want to put all of this together in one pass, I also put together a mid-year WFH ergonomics checklist for big guys that walks through 9 things worth auditing before the slow damage catches up with you.
Sources
- OSHA Computer Workstation Ergonomic Guidelines – Federal guidelines on proper workstation setup, monitor height, keyboard positioning
- EmailAnalytics: The Complete Work From Home Setup Guide – Overview of essential WFH equipment and setup recommendations
- PCWorld: Best Work From Home Tech Gear – Hardware recommendations for home office setups
- Dezctop: Home Office Setup Buying Guide – Detailed guide to home office accessories and ergonomics
- Cornell University Ergonomics: Monitor Placement – Research on optimal monitor height and distance for reducing neck strain
- Ergotron LX Desk Monitor Arm Specifications – Official specs and weight capacity details
- BenQ ScreenBar Halo Product Page – Product specifications and features
- American Academy of Ophthalmology: Computer Eye Strain – Guidance on reducing eye strain from computer screens
Got a WFH Setup Tip? Drop It Below
I’m always looking to improve my home office, and I know some of you have been working from home longer than I have. If there’s an ergonomic upgrade that made a real difference for you (especially if you’re a bigger person), leave it in the comments. Share this post with anyone you know who works from home and complains about their neck. And if you want more big-guy product recommendations, I also put together a guide to camping and tailgate chairs that actually hold up for bigger guys, because good seating matters whether you’re at your desk or at a tailgate, and a summer travel gadgets roundup for big guys who are actually getting out of the house this season. If you’re shopping for a WFH dad this Father’s Day, I also rounded up 7 small tech gifts under $100 that actually get used — all desk-friendly picks in the same spirit. 💪

Pingback: Best Backpacks for Big Guys: 7 That Actually Fit
Pingback: Portable AC Sizing: SACC vs ASHRAE Explained