I run two different hosting providers for my projects, and for a long time that meant a low-grade headache I just lived with. Why I use DigitalOcean for the blog and Render for Trigli is its own story, but the short version is: different tools for different jobs. The problem? Connecting them securely without juggling SSH keys across two providers, without opening ports to the whole internet, and without paying for yet another server to act as a VPN concentrator. That’s exactly the problem Tailscale for side projects was built to solve, and the setup takes about 15 minutes.
No affiliate links here. Tailscale has no affiliate program. I’m writing this because it’s genuinely useful, not because I get a cut.
What Tailscale Actually Is (And What It Isn’t)
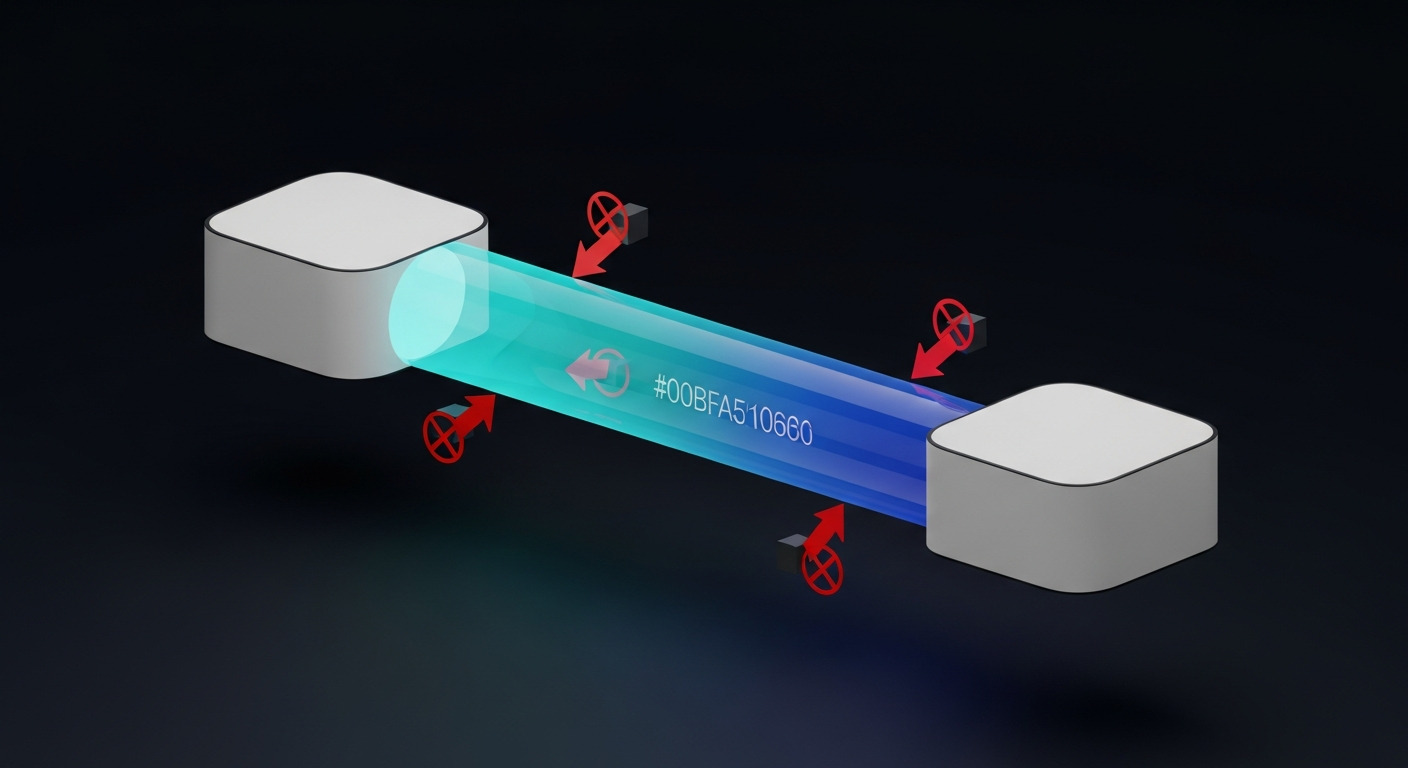
Tailscale is a mesh overlay network built on top of WireGuard, which is an open-source VPN protocol that lives in the Linux kernel. Audited, fast, and way simpler mathematically than OpenVPN or IPsec. The key word there is “mesh”: instead of routing all your traffic through a central VPN server, each device connects directly to the others, peer-to-peer.
Every device you add gets a stable IP address in the 100.x.x.x range (the CGNAT space). That address stays the same regardless of what network the device is on. Your laptop is at 100.64.0.5 whether it’s on home WiFi, a coffee shop, or your phone’s hotspot. Your DigitalOcean droplet is at 100.64.0.12 and stays there. Devices can reach each other by IP or by hostname, and the whole thing is encrypted WireGuard end-to-end.
What it isn’t: an anonymizing VPN. Tailscale doesn’t route your public internet traffic through a server in another country. That’s a different tool for a different job. No CDN, no reverse proxy. Just a private network connecting your stuff, which is exactly the scope tailscale for side projects needs.
Why Tailscale for Side Projects Makes So Much Sense
Here’s the specific pain that drove me toward this. I have a DigitalOcean droplet running this blog. I have a Render service running Trigli. And I have a laptop I work from. Getting those three things talking to each other securely used to mean picking from a bad menu of options.
Option A: leave SSH open on port 22 to 0.0.0.0/0 and hope for the best. Option B: generate SSH key pairs, copy public keys to every server I touch, then lose one of those .pem files six months later and spend an afternoon untangling it. Option C: spin up my own WireGuard VPN server, which is now another thing I maintain, another point of failure, and another monthly bill.
If I’m being honest, I did Option A for longer than I’d like to admit. It’s fine until it isn’t, and then you’re reading auth logs full of brute-force attempts at 2am wondering who’s knocking.
Tailscale is Option D. Private mesh network. No server to maintain. Free for up to 6 users. Every device reaches every other device without a single open port on your public firewall. Using Tailscale for side projects is precisely the use case the free Personal plan was built for, and a two-provider setup like mine fits it perfectly.
Step 1: Set Up Your Tailnet in Under 5 Minutes
Create a free account at tailscale.com. Sign up with Google, GitHub, Microsoft, or a handful of other SSO options. Your “tailnet” is the private network namespace that belongs to your account. Every device you add lives inside it.
Install Tailscale on your local machine first.
On Linux:
curl -fsSL https://tailscale.com/install.sh | shOn macOS, download the pkg installer from the Tailscale site or install via Homebrew. Windows has a regular installer. After that, run:
tailscale upIt opens a browser tab, you authenticate, and your laptop joins the tailnet. Check the admin console and you’ll see your machine show up with its 100.x.x.x address. That’s it for step 1.
The free Personal plan (updated April 2026) covers up to 6 users, unlimited devices, up to 50 tagged resources, and 1,000 ephemeral resource-minutes per month. For a solo founder or small team, you pay nothing. That’s one of the reasons Tailscale for side projects and bootstrapped products has caught on the way it has.
Step 2: Add Your DigitalOcean VM
SSH into your droplet the old-fashioned way. Last time you’ll need that public IP address.
Install Tailscale on the droplet:
curl -fsSL https://tailscale.com/install.sh | shFor a headless server (no browser to open), generate an auth key in the Tailscale admin console under Settings > Keys. Then authenticate with:
tailscale up --authkey=tskey-auth-xxxxxxxxxxVerify it’s connected:
tailscale ip -4You’ll get back a 100.x.x.x address. From your laptop, you can now SSH to that address instead of the public IP. Once you confirm that works, go into your DigitalOcean firewall settings and remove the inbound rule for port 22. Gone. The public internet can no longer knock on that port at all. Anyone who gets your droplet’s IP address finds nothing answering on 22. That’s the security win most guides skip right past.
MagicDNS makes this even cleaner. Tailscale assigns each device a hostname automatically, so instead of remembering 100.64.0.12 you can just:
ssh user@my-dropletMagicDNS resolves it. No more copying IP addresses into your SSH config. For tailscale for side projects on DigitalOcean, this is where it all clicks into place.
Step 3: Connect Your Render Services
This is where the guides that exist fall short. Render containers run unprivileged, which means they can’t access the Linux kernel’s WireGuard module directly. You can’t just run tailscale up inside your app container and call it a day. You’ll get an error about TUN devices and move on with your life having learned nothing useful.
The solution is the official render-examples/tailscale subnet router. You deploy this as a separate Render Private Service alongside your app. It runs Tailscale in userspace networking mode (no kernel WireGuard needed), connects to your tailnet, and then advertises the entire Render private network (10.0.0.0/8) as a subnet route.
The setup is deliberately minimal. One environment variable on the subnet router service:
TAILSCALE_AUTHKEY=tskey-auth-xxxxxxxxxxUse a one-off auth key (not a reusable one) for security. After the service starts and joins your tailnet, go to the Tailscale admin console, find the subnet router device, and approve the 10.0.0.0/8 route.
Done. Now your laptop and your DigitalOcean droplet can reach any Render private service at its internal 10.x.x.x IP, without exposing any public ports on Render at all. Your Trigli API internal service, your managed Postgres, whatever’s running on that private Render network is now reachable from your tailnet.
One gotcha worth knowing: the subnet router is a billable Render Private Service. The smallest instance runs around $7/month. For most side projects that’s still cheaper than running a dedicated VPN server, but factor it in. You’re not getting Render integration completely free. In the context of Tailscale for side projects overall, $7/month beats the alternatives pretty convincingly.
Why Not Just Open a Port?
Because port 22 open to the world is a brute-force magnet. Full stop.
Yes, key-based auth means an attacker can’t get in without your private key. But your server is still accepting TCP connections from every IP on the planet and running the SSH handshake for each one. That’s noise in your logs, CPU cycles burned on auth rejections, and occasionally a zero-day in sshd that turns “not a real risk” into “call it a very bad Tuesday.”
With Tailscale, port 22 isn’t open. The service isn’t listening to the public internet. An attacker with your droplet’s IP address gets nothing. To reach your server over SSH, you need to be a node in my tailnet, and that requires authentication. It’s not “harder to brute force.” It’s “the attack surface doesn’t exist.”
For a solo dev who isn’t monitoring auth logs daily, this matters. Set it up once and stop thinking about it. That hands-off security posture is a huge part of what makes Tailscale for side projects the obvious choice over rolling your own WireGuard setup.
Tailscale SSH: Replacing Key Management Entirely

The step above gets you SSH over Tailscale using normal key-based auth, just routed through the private 100.x.x.x addresses. Tailscale SSH goes further: it replaces the key management entirely.
Enable it on the server:
tailscale set --sshAdd an SSH access rule to your tailnet’s policy file in the admin console (Tailscale’s docs have the exact JSON snippet). Then connect from any authenticated tailnet node:
ssh user@my-dropletNo ~/.ssh/authorized_keys lookup. No private key on your client. Authentication happens through WireGuard node keys managed by Tailscale’s control plane. No more copying public keys to new servers. No more lost .pem files. Stand up a new droplet, add it to the tailnet, and your SSH access follows automatically.
A few honest caveats. Tailscale SSH works on Linux and macOS servers only. Windows support is limited. And there’s a subtlety about access control: any OS user on an authenticated tailnet node can connect unless you restrict it in your ACL policy. For a production server, use “check mode” in your policy, which requires re-authentication through Tailscale after a set period (the default is 12 hours). That gives you session expiry without per-user SSH keys.
For most side projects running on a single droplet? The default is fine. Just know the option exists if you add teammates later. And if you need more fine-grained control, that’s covered in the small team section below, which is really where Tailscale for side projects that have grown into actual products starts to shine.
Small Team Setup: Sharing Access Without a VPN Server
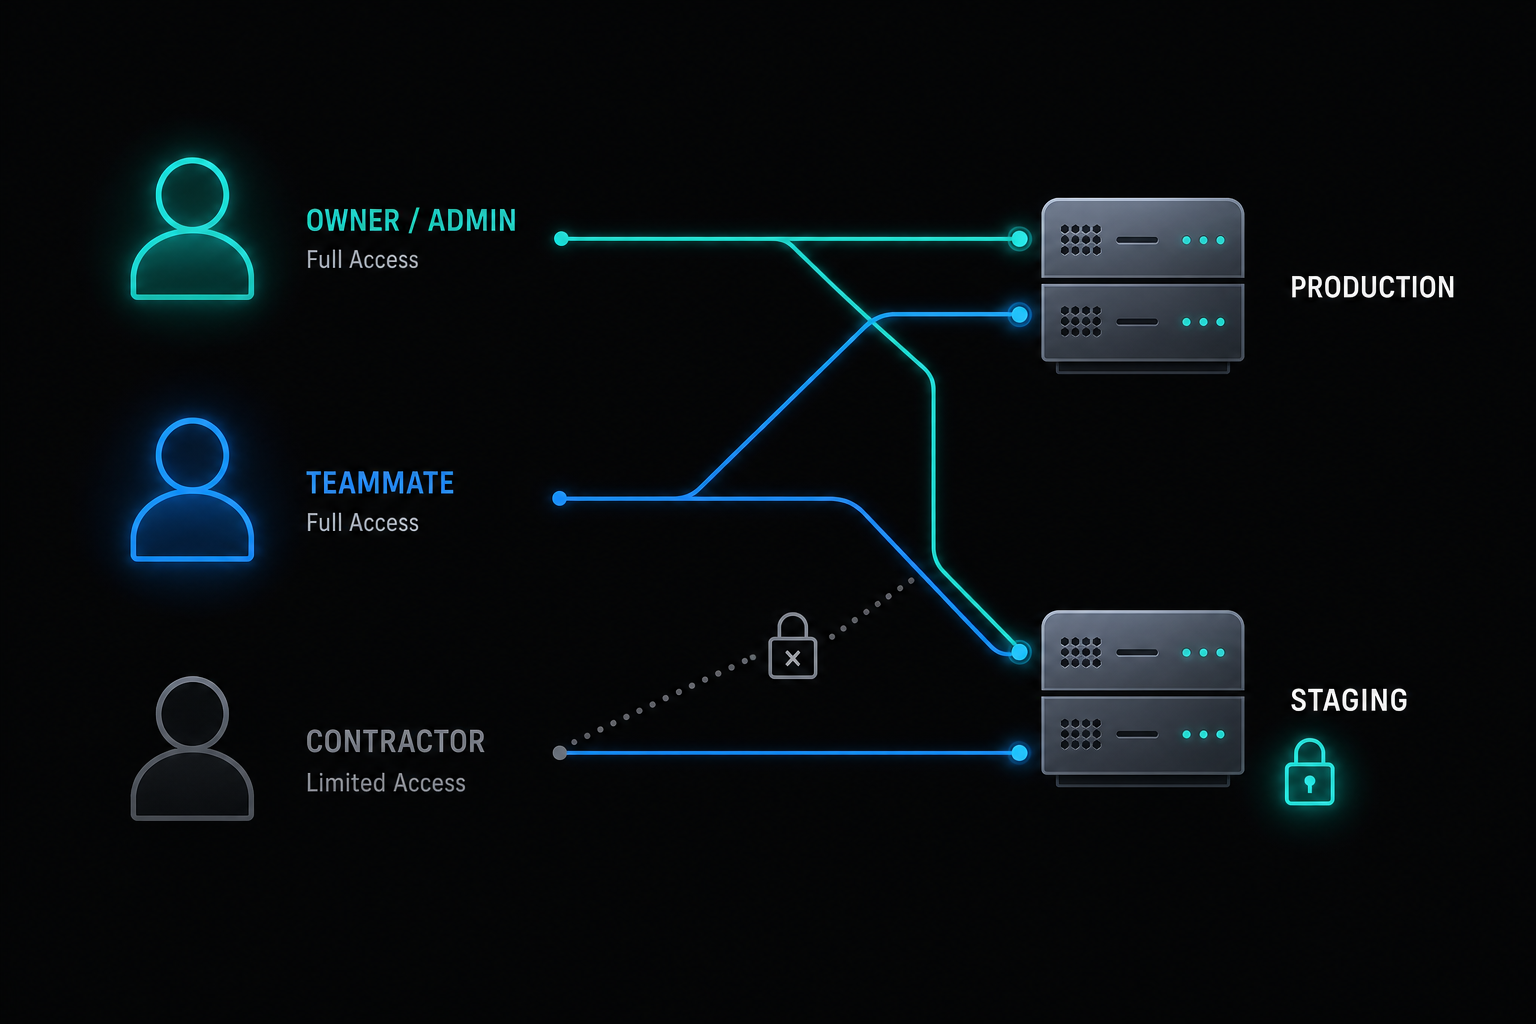
This is where Tailscale earns its keep for small teams. Sharing server access traditionally means either sharing a private key (bad), setting up a bastion host (annoying), or paying for something like HashiCorp Vault (overkill for 3 people).
With Tailscale: invite a teammate by email from the admin console. They install Tailscale, log in with their account, and join the tailnet. You write an ACL rule that says which nodes they can reach. Done.
A minimal ACL example: give your contractor SSH access to the staging server but not production. Give yourself access to everything. No firewall changes per person. No cert rotation. No ceremony.
{
  "acls": [
    {
      "action": "accept",
      "src": ["tag:owner"],
      "dst": ["*:*"]
    },
    {
      "action": "accept",
      "src": ["tag:contractor"],
      "dst": ["tag:staging:22"]
    }
  ],
  "tagOwners": {
    "tag:owner": ["autogroup:admin"],
    "tag:contractor": ["autogroup:member"]
  }
}
Paste that into Access Controls in your admin console under the tailnet settings. The owner tag reaches every node on every port. The contractor tag reaches only nodes tagged staging, on port 22 only. No per-user firewall changes. No cert rotation. No ceremony.
The free tier handles up to 6 users. If you grow past that, the Standard plan is $8 per user per month, which gets you unlimited users, SCIM provisioning, and up to 10 ACL groups. For most side projects, you’ll never leave the free tier. That’s the honest case for Tailscale for side projects and early-stage teams: the cost math is genuinely hard to argue with.
Does Tailscale Work on Render?
Yes, with the subnet router pattern described in Step 3. The short answer is you cannot run tailscale up directly inside a Render service container. Render’s runtime is unprivileged and doesn’t give your container access to TUN devices or kernel WireGuard. If you try, it fails with a permission error and you’ve learned a lesson about containerized environments the hard way.
The subnet router runs in Tailscale’s userspace networking mode, which works without kernel privileges. It’s slightly slower than kernel WireGuard, but for internal service access (hitting a database, an API, a microservice) the throughput is fine.
Render has a one-click deploy template at render.com/templates/tailscale and the open-source repo is at github.com/render-examples/tailscale. The Render team also wrote a walkthrough post focused on VS Code remote development, which covers the same subnet router pattern if you want a second perspective. Their guide uses dropbear instead of OpenSSH because of container constraints, which is a gotcha that can confuse you if you’re expecting standard SSH behavior. For general service access (not interactive SSH into a Render container) the subnet router approach in Step 3 is what you want, and it’s the piece that makes tailscale for side projects work cleanly across two hosting providers.
What Tailscale Won’t Do
Worth saying clearly, because I’ve seen people try to use this as a Cloudflare replacement and then be confused when it doesn’t work that way.
Tailscale doesn’t anonymize your public internet traffic. Your outbound requests to GitHub, Stripe, whoever, still originate from your machine’s real IP. Exit nodes exist as a feature, but that’s a separate configuration and still isn’t hiding you from a determined observer. It’s for routing around network restrictions, not for privacy from the sites you visit.
Tailscale isn’t a firewall. It controls which tailnet nodes can reach each other, but it doesn’t inspect or filter traffic. Your application-level security is still your problem.
And it’s not a CDN. Tailscale has a feature called Funnel that can expose a local service to the public internet, but it’s not designed for high-traffic production serving. Don’t route your blog traffic through it.
For the side-project use case, none of these limitations matter. You want private connectivity between your own machines, across two cloud providers, with no server to babysit. Tailscale for side projects delivers on that exact promise, nothing more, nothing less, and that specificity is what makes it worth recommending over more complicated tooling.
One technical footnote worth knowing: when both nodes sit behind strict NAT and can’t punch through to a direct peer-to-peer connection, Tailscale falls back to relaying traffic through a DERP server (Designated Encrypted Relay for Packets). Latency is slightly higher than a direct P2P link, but for SSH and dev workflows it isn’t a dealbreaker. If you see unexpected slowness between two nodes, DERP fallback is the first thing to check.
And for developers who’d rather not run a SaaS coordination server at all: Headscale is the open-source self-hosted implementation of the Tailscale coordination server. It’s compatible with official Tailscale clients and works for small personal setups and homelab networks. For most side projects, the SaaS dependency isn’t a real concern, but the self-hosting option exists if you need it.
The real pro tip from this post: the first thing to do after adding your DigitalOcean droplet and confirming Tailscale SSH works is to delete that port 22 firewall rule. You’ll feel unreasonably good about it. 🔒
Tailscale for AI Coding Agents (Aperture)
Worth flagging as something to watch: Tailscale’s Aperture, an AI gateway that reached public beta in April 2026, added identity-aware connectors on June 16, 2026 that let AI coding agents like Claude or Gemini reach your internal resources through Tailscale’s identity and access controls, using MCP and API endpoints. Those connectors are still in alpha.
The underlying problem Aperture is trying to solve is real. When an AI agent needs access to internal services like a private Render endpoint or a dev database, the current options are either distribute an API key externally and rotate it when it leaks, or expose a public endpoint and expand your attack surface. Aperture routes the agent through an identity layer with access controls, the same way you’d gate a contractor. The agent reaches only what the policy allows, nothing more.
Aperture itself is in beta as of this writing, and the MCP/API connector piece is still in alpha, so the feature surface is still moving. It’s free across all plans during the beta. If you’re running Claude Code or similar agents on side projects, check the Tailscale changelog for current access status and what MCP servers are supported.
Sources
- Tailscale quickstart documentation
- Tailscale SSH documentation
- Tailscale subnet routers
- Tailscale pricing (April 2026 update)
- Tailscale pricing update: clearer plans, more value
- Host a Dev Environment on Render with VS Code and Tailscale (Render blog)
- render-examples/tailscale subnet router (GitHub)
- Securely Connect to Your DigitalOcean Database With a Droplet and Tailscale Subnet
Join the Conversation
What’s your current setup for getting into your cloud infra? Are you still doing the SSH key shuffle across machines, running a bastion host, or something else entirely? If you’ve tried Tailscale, I’d genuinely like to know how the Render integration worked out for you, because the subnet router approach is underexplained almost everywhere. Drop a comment below or share this if it saved you an afternoon of googling. And if you’re adding a home server to the mix (because Tailscale makes a homelab a real option), the sub-$200 Linux home server build is a good starting point, and the Proxmox vs TrueNAS vs Unraid breakdown will help you pick what runs on it, and the mid-2026 state of self-hosting survey covers which services are actually worth running yourself versus leaving on managed infrastructure. 👋